Images From OOMMF Outputs
Once you have installed OOMMF, and ran some simulations, you will at some point probably want to produce some images of your simulation outputs. It’s not obvious how to do this, so this post explains how you can make images from oommf outputs using the command line tool ‘avf2ppm’ that comes with OOMMF.
OOMMF Vector Outputs
OOMMF can produce vector outputs for representing magnetisation or magnetic fields. These vector outputs can viewed and explored in the mmDisp vector field display tool. Often, though, it would be good to export slices of these vector outputs as bitmaps (such as for figures in presentations or papers). 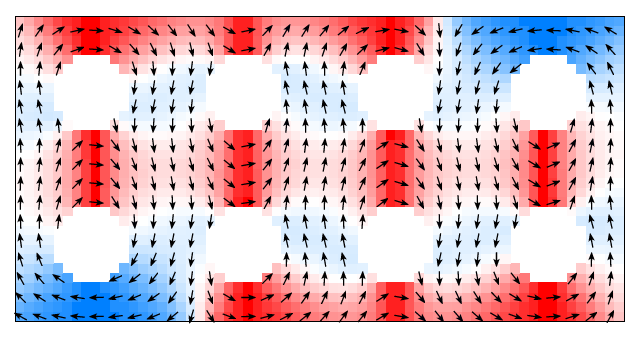 It is technically possible to ‘save as’ a bitmap file by loading a vector file from the mmDisp window. I would not recommend this though as it slow to do for multiple files and it is easy to lose track of any naming conventions or metadata held in the filename.
Automatic Vector Outputs
If you haven’t already, I also suggest you read my short post about automating outputs in OOMMF. This allows you to set OOMMF to save outputs at set intervals during the simulation rather than having to do so manually via the gui.
A Built-in Tool
OOMMF, thankfully has a useful built-in tool for converting vector outputs (describing magnetisation or magnetic fields) to bitmaps. Rather confusingly, this tool is called avf2ppm, in reference to an uncompressed bitmap format called ‘ppm’ which is rarely encountered outside of specialist circles. Naming aside, the avf2ppm tool is actually easy to use, and has comprehensive documentation on the OOMMF website.
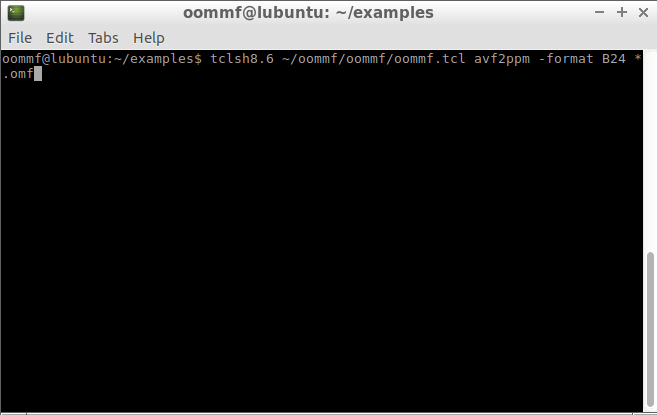
I recommend you read the full documentation, but if you just want to get started with making images from oommf outputs, then you can follow these simplified instructions (this is tested in Linux, but the function should be mostly the same in windows). Change directory to the one containing the vector files you want to convert (by default OOMMF outputs to the same directory as the mif file that it ran). In this directory there should be some ‘omf’ (magnetisation) or ‘ohf’ (H-field) files. Now run this command (making sure you set the path to your oommf.tcl correctly):
1
tclsh /path/to/oommf.tcl avf2ppm -format B24 *.omf
 |
|---|
| Images From OOMMF Outputs - command to type |
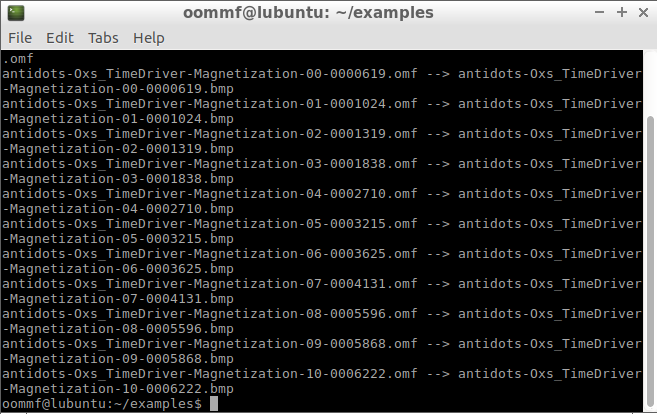
This command should take all .omf files in the directory and produce corresponding .bmp files with the same name. If you only want to convert a single vector file, then give the file name rather than the wildcard *.omf.
 |
|---|
| Images From OOMMF Outputs - output log |
Since we only specified a few options in this command, avf2ppm will mainly be using defaults. You may want to review the OOMMF documentation for avf2ppm to make sure you are happy with what those defaults are.
Configuration Files
avf2ppm has the option to provide a separate configuration file. The default parameters will probably be fine in many cases, but you may wish to make alterations. You can see what the default configuration file looks like on the OOMMF documentation pages - the options are fairly clear, and there is further documentation available too.