Python Tkinter Example
This post works through a simple example of creating a GUI in python using Tkinter. The python tkinter example goes through some simple things that a GUI would need to do such as creating new windows, text input, and labels. This isn’t a tutorial as such, but instead I’ve tried to pick out a few of the basics of tkinter so that they are in one place. You can use this basic example as a starting point for more sophisiticated GUI applications. This example is available on github.
 |
|---|
| tkinter example |
Why Tkinter?
There are a number of GUI libraries available for python, so why tkinter?
- Portability - Tkinter is also designed to make use of the existing styling of the operating system it is running in, rather than bringing its own widgets.
- Simplicity - Tkinter is also fairly simple to get started with (as you will see in this example), so is good for
- Availability - Tkinter is typically packaged with python, so if package availability is a challenge for you, then Tkinter may make sense
An Example
In this example I’m going to step through the creation of a simple GUI featuring:
- A main window
- Two sub-windows
- Creating an alert box
- Creating an 'About' menu item
I have deliberately left out the less essential parts of the GUI design such as sizing and exact layout. This is important to consider, but for the purposes of learning I find it can distract from the truly essential parts of the code.
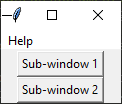
Create The Main Window
We’re going to be making main window that looks like this - two buttons that open sub-windows, and a Help menu.
 |
|---|
| Main window |
1
2
3
4
5
6
7
8
9
10
11
12
13
14
15
16
17
import tkinter
from tkinter import messagebox
import os
window = tkinter.Tk()
window.title("Main Window")
# create a toplevel menu
menubar = tkinter.Menu(window)
helpmenu = tkinter.Menu(menubar)
menubar.add_cascade(label="Help", menu=helpmenu)
helpmenu.add_command(label="About")
# display the menu
window.config(menu=menubar)
btn = tkinter.Button(window, text="Sub-window 1")
btn.pack(anchor='center')
btn2 = tkinter.Button(window, text="Sub-window 2")
btn2.pack(anchor='center')
window.mainloop()
At this stage the buttons won’t do anything. We’ll add that later.
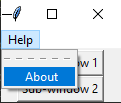
Add an 'About' box
Next, we add an ‘About’ option to the ‘Help’ menu:
 |
|---|
| About menu |
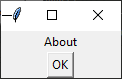
Clicking that ‘About’ option will create an ‘About box’
 |
|---|
| About box |
We do this by first creating a function to hold the details of this new ‘About’ window, along with a corresponding reference to that function in the button click. First, we’ll create a function to hole the ‘About’ window:
1
2
3
4
5
6
7
8
def create_about():
    about_window = tkinter.Toplevel(window)
    about_window.title('About')
    lbl = tkinter.Label(about_window, text="About")
    lbl.config(anchor=tkinter.CENTER)
    lbl.pack(anchor='center')
    btn = tkinter.Button(about_window, text="OK", command=about_window.destroy)
    btn.pack(anchor='center')
And then update the ‘helpmenu’ menu bar to include a command which points to that new function.
1
helpmenu.add_command(label="About", command=create_about)
Add the First Sub-window
In this first sub-window, we’ll add quite a bit of functionality:
- Close a window with a click
- Add text box / label to a window
- Centering text box / label
- Get a value from a button click
- Use a button to run non-UI functionality
- Use a button to create an information box
As with the ‘about’ box, we can keep the details of this new sub-window inside its own function, and then reference this function in the button click. First we can update the button click to reference a function:
1
btn = tkinter.Button(window, text="Sub-window 1", command=create_subwindow1)
And then add the function itself
1
2
3
4
5
6
7
8
9
10
11
12
13
14
15
16
17
18
19
20
21
22
23
def create_subwindow1():
def retrieve_input():
entryText = entry.get()
if os.path.exists(entryText):
lbl2.config(text='A file')
else:
lbl2.config(text='Not a file')
sub_window = tkinter.Toplevel(window)
sub_window.title('Sub-window 1')
lbl = tkinter.Label(sub_window, text="Sub-window 1")
lbl.config(anchor=tkinter.CENTER)
lbl.pack(anchor='center')
btn = tkinter.Button(sub_window, text="Close", command=sub_window.destroy)
btn.pack(anchor='center')
lbl2 = tkinter.Label(sub_window, text="")
lbl2.pack(anchor='center')
entry = tkinter.Entry(sub_window)
entry.pack(anchor='center')
buttonCommit=tkinter.Button(sub_window, text="Check path exists",
command=retrieve_input)
buttonCommit.pack(anchor='center')
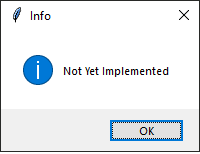
btn2 = tkinter.Button(sub_window, text="Functionality 2", command=lambda: messagebox.showinfo("Info","Not Yet Implemented"))
btn2.pack(anchor='center')
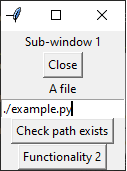
The resulting sub-window should look like this:
 |
|---|
| Sub-window |
And the ‘Not Yet Implemented’ info message when we click on Functionality 2 comes up as this:
 |
|---|
| Not yet implemented info message |
Add the Second Sub-window
Finally we’ll add the code for the second sub-window, although this time we are actually going to make a warning window.
|
|---|
| Not yet implemented info message |
Again, we follow the same pattern of updating the button ‘command’ attribute. A difference here is that rather than creating a separate function, we instead create a inline, lambda function to hold the message box creation:
1
btn2 = tkinter.Button(window, text="Sub-window 2", command=lambda: tkinter.messagebox.showwarning("Warning","Warning message"))